
How to start a blog with Hostgator TODAY
Wohooo… You have decided to start a blog of your own!
First off, congratulations and today, I will teach you how to start a WordPress blog with Hostgator.
This post is a step by step tutorial and by the end of it, you will have your blog up and ready.
I would love to know why you decided to start a blog (comment below and let’s talk) but whatever may be your reason –
It is worth it!
You can earn as little as $500 a month spending a few hours in a month and as much as $100000 a month
Relevant read
3 best ads network for bloggers (+ perfect Adsense alternative)
How to make money blogging for beginners: Income Report [Sept-Dec 2018]
How to make money with a blog for beginners? 17 bloggers tell you!
This tutorial will cover how to start a blog with Hostgator. If you are not interested in hosting with Hostgator, check out my blog post on how to start a WordPress blog with Bluehost.
It will take you approx. 15-20 minutes to get your blog up and running. Just follow the steps and start out.
But before we talk about how to start a blog with Hostgator, I want to list out the benefits of hosting with Hostgator
- Hostgator is the cheapest web hosting starting at $2.75/month.
- They are easy to use and install.
- Round the clock technical support on call/chat.
- Hostgator offers 45 days of money-back guarantee.
- 99.9% of uptime guarantee.
- Automatic backup
- Free SSL
- Unlimited storage
- Unlimited email addresses.
The post includes affiliate links.
Want to make money quickly? Here are a few platforms to earn up to $25 – $50 in a few minutes!
- Freecash: Get your own free account, complete small tasks, start collecting coins and cash them out. They’re giving out $500 a day & over $2500+ to their top users. Sign up here.
- PineCone Research: Earn $3 – $5 per each survey guaranteed.Sign up now
- SurveyJunkie: With each survey, you can earn up to $3 – $7 easily. Signup here
- HarrisPoll: Get paid to watch videos, play games, and shop online. Also, get a Signup bonus. You can get signup now
- Rakuten: Up to $50 per survey & $0.50 per email. $5 per referring friend, sharing payment receipts. Join now for FREE.
- Neilsen Computer and Mobile panel: Get paid to ONLY install the app and do nothing else.
Looking for other paid survey opportunities? Check out how to make $100 per survey and the highest-paying survey companies.
HOW TO START A BLOG WITH HOSTGATOR – 7 EASY STEPS:
STEP 1 – CHOOSE YOUR HOSTING PLAN

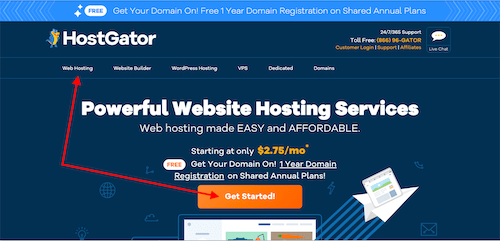
- Click here to open up Hostgator in another window so you can follow the instructions easily.
- Click on Web Hosting or click on the tab “Get Started Now” – This will bring you to a page that lists all the hosting plans with Hostgator
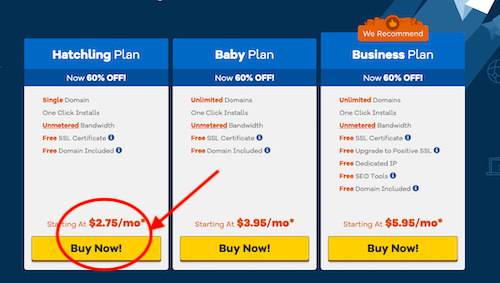
- Select the Hatchling plan.
Hostgator has 3 options for hosting – Hatchling, Baby and Business plan. If you are just starting out and have no following whatsoever, it is best to start out with the cheapest option i.e. Hatchling.
Hatchling plan will allow for only one domain name. If in future, you do plan to start more blogs or websites with Hostgator, you can upgrade the plan to Baby. - Click on BUY now.

STEP 2 – SELECT A DOMAIN NAME
Once you click on Buy Now, you will be taken to the Hostgator checkout page.
The first and foremost thing that you need to have before you sign up for hosting with Hostgator is to have a domain name.
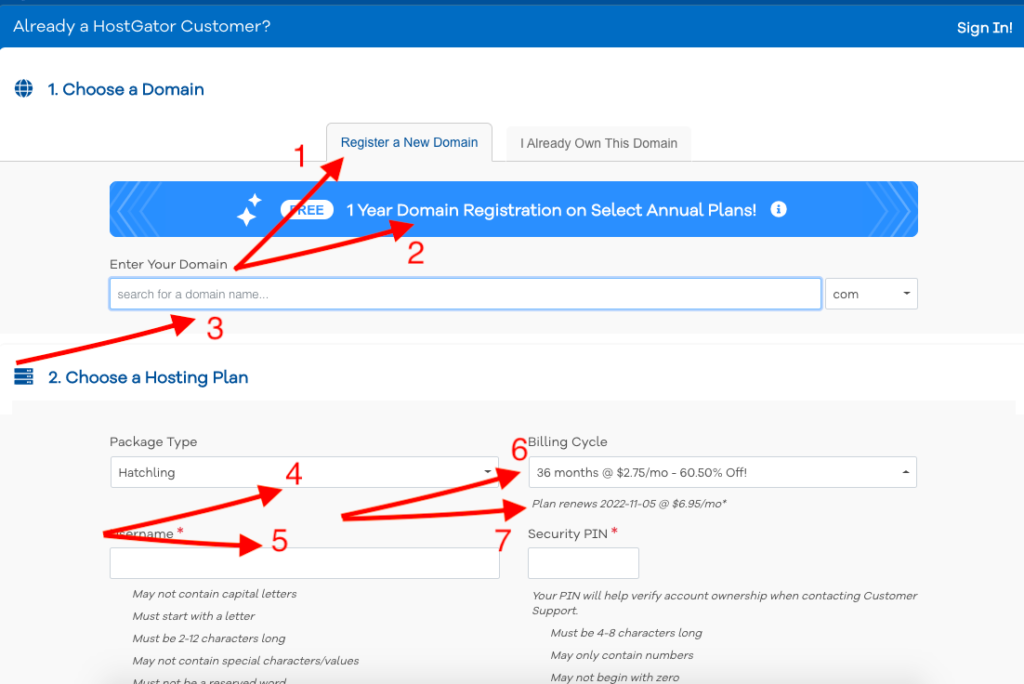
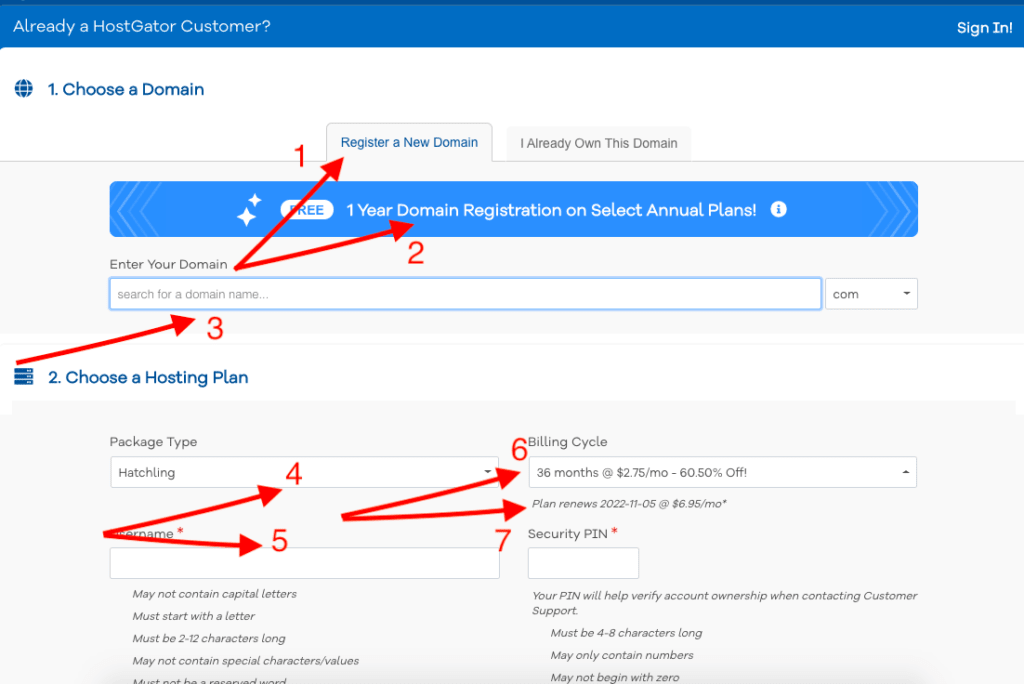
Select on register a new domain name [Depicted as 1 in the screenshot]
Domain name is basically the name of the website. For example, my domain name is mrsdaakustudio.
Read: 5 surefire ways to come up with clever blog names
You can have any name for your website but overall you have three options
- Use your name – For example, Sara Titus (a known blogger) has a blog name sarahtitus.com
- Use a name that tells what your blog is all about – For example, Michelle, a known personal finance blogger has a popular blog named makingsenseofcents.com
- Use a completely different name – For example, like I have
If you put in a domain name in the bar and its taken, you cannot go ahead with it. You will have to come up with another one.
The cost of domain is not included in the hosting. So, your bill will reflect an additional $12.95 per year for domain names
However, if you buy hosting plan for a year or more, your first year of domain name is paid up by Hostgator [Depicted as 2 in the screenshot]
A few tips before deciding on the domain name
- It should be easy to remember and easier to spell out.
- Use a .com over anything else unless you decide to country specific with the website
- Have a short domain name. 8-15 characters are ideal
STEP 3 – ENTER YOUR HOSTING INFORMATION
Once you have decided on the domain name and it confirms it is available, we can move on to the next section.
- It is tile to fill out your hosting package information. [Depicted as 4 in the screenshot]
Don’t worry – you do not need to fill it out. If you selected the right plan beforehand, it will be auto-filled.
In case, you want to change it – just select the right hosting plan from the drop down - Focus on the Billing Cycle. [Depicted as 6 in the screenshot] You may be decided to go for a month or 3 months at max (I was!) but in my experience, you should go for at least 12 months plan. The longer, the better.
When you take a shorter plan, you will pay more. For example, if you take a 12 months plan, you are charged at $5.95 a month.
But, if you take a 36 months plan, you are charged at $3.95 a month.
Also, upon renewal, the prices go a little higher and you do not want to deal with that so soon. You can see the renewal cost just below the billing cycle box [Depicted as 7 in the screenshot] - You will be required to then create a username and a security pin. You will be using this username to login to your Hostgator hosting account and the security pin is for future purposes (in case you ever forget anything) [Depicted as 5 in the screenshot]
Sign up with Hostgator now
STEP 4 – ENTER YOUR BILLING INFORMATION
You are almost there.
Fill out all the boxes for your billing information.
STEP 5 – CHOOSE YOUR HOSTING ADD-ONS
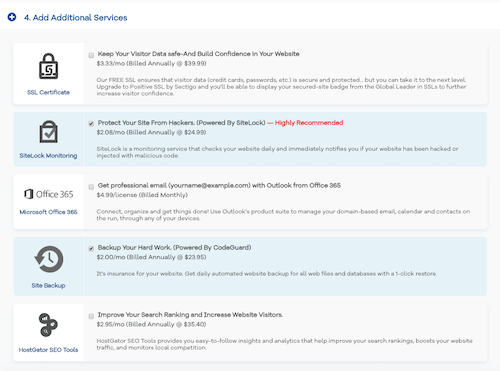
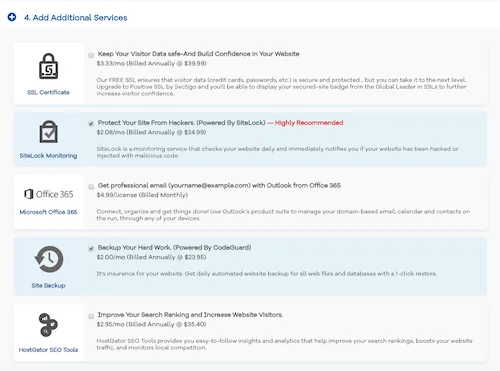
Your screen will prompt you to add a few add-ons that you can use with your blog.
You can go ahead without buying any one of them. However, there is one you can decide to buy – it is the domain privacy protection.
That means, your details like name, phone number and address will be secure and cannot be found by anyone online.
Without having this add-on, you can easily find details of owners on whois.com.
There is no other add-on that you need at this point in time.
STEP 6 – REVIEW ORDER DETAILS & CREATE ACCOUNT!
Review everything that you have filled out.
Remember, that you get a round the clock phone, live chat and email support with Hostgator along with a 45 day money back guarantee if you decide blogging isn’t for you.


Your final payment will include
- Hostgator domain registration – If you take 12 months+ subscription, your first year of domain is free
- Hostgator hosting plan
- Hostgator Hosting Add-ons if applicable
Once you have done all the steps above, check the box that says
“I have read the terms and conditions, etc” and hit Checkout
You will receive an email with
- Welcome note
- URL to access control panel (backend of hosting)
- Password
You want to mark this email important and save it for future reference.
STEP 7 – INSTALL WORDPRESS
Let’s install wordpress now.
- Go to the email, click on the control panel URL and login
- Look for QuickInstall
- Click on WordPress and put in the relevant details. It will start downloading and installing.
Note: NEVER use admin as your login information. It is subject to easy hacking. Pick up something unique and if possible, different from your blog.
All the login information will be emailed to you. The URL you will use to login to your blog will look like ‘yoursite.com/wp-admin’.
Congratulations, the process is complete. You have not only purchased your own domain but you have a blog now.
Easy, isn’t it?
Read: Understanding setting up a blog on WordPress – Part I
A few plugins to start with
Once you have installed WordPress, you will also need a few plugins for your blog.
- Yoast SEO
- WP Super Cache
- UpdraftPlus- Backup/Restore
- Akismet Anti-Spam
Sign up with Hostgator NOW
I recently talked to fellow bloggers and they had some amazing tips to share for beginner blogger and for the summer slump
If you are starting out, you SHOULD also check out this roundup on expert tips on driving traffic to a new blog and start with my start a blog series.
Grab this 5 day FREE challenge for beginners & FREE Traffic Transformation Guide today
Recommended tools for blogging for beginners
Sign up with Hostgator NOW
Blogging Courses
- Ready Set Blog for traffic – It is an EXTREMELY underpriced course on how to make money with a blog for beginners.
It tells you how to set up your blog, use Pinterest and implement SEO strategies. Using her tips, I have been able to rank on page 1 of Google. You can read my first income report here. - TSA – They are a bunch of resources by the owner of theSheApproach. Her books are amazing and filled with great information.
You can get affordable (and, many of them are free as well) on affiliate marketing, boosting traffic, and Pinterest strategies.
Search Engine Optimisation (SEO)
- Stupid Simple SEO (FREE COURSE) – It is the best investment I have made in the blog land. Take Mike’s course, apply it on your blog and you can see the results pouring it.
- FREE SEO lessons (video) – If you’re looking for video classes on SEO, you cannot miss out what Lena has to tell you.
- Easy backlinks for SEO and Easy on-page SEO. Excellent resources!
Pinterest (DO NOT MISS THIS!)
- Take this FREE Pinterest class by Cate Rosales.
- Pinteresting Strategies – This is an affordable course that tells you how to use (and, how NOT to use) Pinterest to drive traffic. Using this, I have been able to get a 200% increase in traffic within 2 months.
- PinterestNinja – Well-known bloggers stand by this course, and I am going to be investing in it myself sometime soon. Check it out here
Affiliate Marketing
- Affiliate marketing for bloggers – The ONLY resource I have used, which taught me everything required.
I also understood a lot of things that I were doing wrong and could have been dinged by Google. Thank god! - Affiliate marketing simplified by Cate Rosales is one of the BEST courses I have come across. If you are thinking of investing in one, this should be it.
In case, you do NOT want to spend any money in learning the basics, you can sign up with Skillshare using my link and get free access to premium training for 2 months.
Relevant read:
How to drive traffic to a new blog for beginners: 18 experts share!
7+ best blogging tips for beginners: Interview 11 with Arfa, SheMeansBlogging
20+ blogging tools for beginners and freelance writers
I hope this tutorial helped on how to start a blog with Hostgator. If you are already hosting with Hostgator, I would love to hear your experience.
Resources that can help you with land work from home jobs
How to find and pitch clients your freelance services– You can find my strategies to find high-paying freelance writing clients.
Become a work at home mom– A FREE training session that comes along with a workbook and guides you through the entire freelancing journey.
FlexJobs You can find 100% legitimate work from home jobs and freelancing gigs on this platform